Assembly instructions
Preparation and Procedure: Follow these steps for easy and safe assembly.
Introduction
Thank you for choosing TurboSkyMount, your expert in camera mounts for skydiving! Our ultra-durable mounts (carbon fiber) with 3M VHB adhesive (50kg strength, -35°C to +120°C) are designed for all spherical or flat helmets, such as Cookie G3, G4, Tonfly TFX (non-exhaustive list), and comply with the DT52 standards of the French Skydiving Federation (https://www.ffp.asso.fr/).
Contents of the package
- TurboSkyMount camera mount: magnetic bloc (base + upper part) + flexible camera adapter
- 3M VHB Adhesive (pre-installed)
- Cutaway Handle
- Male velcro square to be attached to the helmet to secure the cutaway handle
- Aluminum mounting adaptor for Insta360 X camera (if applicable)
- Fixing Screw
- Surface preparation kit (wet + dry cleaning wipes)
Precautions
- Check the mount before each jump to prevent any loss.
- Do not modify the mount (e.g., drilling), as this may compromise safety.
- FFP Compliant: meets the DT52 requirements for carrying camera equipment in skydiving in France.
Customer support
Any questions ? Contact us:
- Email: support@turboskymount.com
- Website: https://www.turboskymount.com
Share your expérience
Satisfied with your mount? Leave a 5-star Google review in just 2 minutes!
User manual
Use
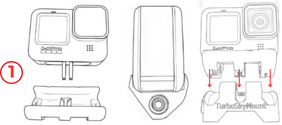
1) Insert the camera into the flexible adapter, then assemble the flexible adapter with the upper magnetic part.
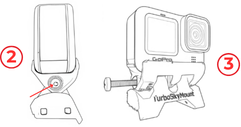
2) Ensure the screw insertion holes are properly aligned to insert the fixing screw effortlessly, then insert the screw into the adapter through the hole on the open side.
3) Using a screwdriver, firmly tighten the screw to secure the assembly, ensuring the mount is stable and does not unintentionaly move.
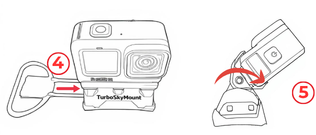
4) Gently snap the upper magnetic part onto the flexible magnetic base fixed to the helmet, then install the cutaway handle by fully inserting the metal pins into the corresponding holes, on the side you have chosen. Finally, secure the handle by attaching its female velcro to the male velcro glued to the helmet.
5) Adjust the camera angle with manual pressure on the camera, with no need of using a screwdriver. The flexible camera adapter allows the fixing screw to remain firmly tightened without risk of breakage, preventing any angle changes caused by relative wind during freefall.